
[ John's Home > Our Strawbale Home > Stucco Sprayer - Version 2 ]
Background
My original sprayer had some problems:- The hopper was awkward to fill.
- The hopper was too high (this made it difficult to spray near the ceiling).
- The pole on the bottom made it hard to spray near the floor.
- It was difficult to build - specifically: there was no detail on how to build the hopper.
- The hopper was heavy when full of mortar.
- The on/off valve for the compressed air was awkward to use.
The Plans
Here are the plans:- In PDF format (this is good for viewing and printing). Thanks to David Neeley for supplying this!
sprayer_v2.pdf (174K)
- In DXF format (I produced them using QCad - which is free software). Some people have reported having problems loading this into AutoCAD(tm). But I am told it loads ok when using Intellicad(tm).
sprayer_v2_1.dxf (64K)sprayer_v2_2.dxf (28K)
- In GIF format (you should be able to see these with your web browser).
sprayer_v2_1.gif (23K)sprayer_v2_2.gif (24K)
- Hack saw
- Blow torch and solder
- Hand Drill
- Tin snips
- Pop rivet gun (if you don't have a pop rivit gun, you could use bolts and/or screws instead of pop rivits)
- Screwdrivers, wrenches
- A vice is handy
Regarding building the hopper - I found doing a prototype in cardboard to be very useful. Once I figured out the shape and all the required folds then I copied this to sheet metal to make the real thing. While in cardboard, I used a stapler to hold the pieces together.
The dimensions on the diagram have a code beside them (e.g. 8" (w) or 7 1/2" (dj)). These codes refer the the values calculated by the this spreadsheet. If you want to make the hopper bigger or smaller, play with the spreadsheet and new values will be calculated for the hopper pattern. Note: these dimensions are approximate and don't account for thickness of the material so you should do a mockup in cardboard first and adjust the pattern before cutting it out in metal.
Another tip: do not glue the ABS pipe together because you will want to take the sprayer apart later to fix things or to clean it. It is better to use a few screws or bolts to hold the pieces together.
Also, in the plans there is a double fold "FoldC". This was done to try to make the hopper not leak. However, in hindsight, this is probably too complicated. Perhaps a single fold with some extra pop rivits and maybe some caulk will make a tight hopper that wont' leak. I'm not sure.
The construction requires some mechanical skills. If you don't feel capable then you might find a friend to help build this or perhaps even approach your local school - this might make a good project for shop class.
Some Pictures
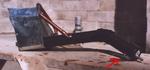
Below is a closeup of the sprayer. The big arrow points to the nozzle where the compressed air comes out. The small arrow points to a pop rivit I used to construct the hopper.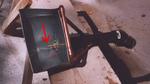
Below is another closeup. The arrow points to the compressed air trigger.
Some more pictures (use your Back button on your browser to get back to this page):
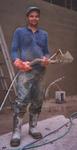
- A picture of me testing the sprayer with some water (just after constructing the sprayer).
- My surface bonded block wall. The house sits on a steep hill. Notice all the buttresses to support the wall. The hole in the wall just under where I'm working is going to be an underground cold box set in the hill.
- Closeup of the wall - you can see me "knocking down" the stucco just after it has been sprayed.
Operation
I haven't used the sprayer for spraying a strawbale wall (yet). This will happen this summer (2002). But I have used it to put the surface bonding on my surface bonded block wall. I was very happy with the results. Compared to other surfaced bonded walls I have done, the sprayer made the work go about twice as fast compared to manual application. Also, my wrist wasn't aching after finishing (manual application requires a lot of pushing to get a good bond - which is hard on my wrists).To fill the sprayer, use it like a shovel. This requires a mortar pan in which you can easily scoop up mortar. I.e. a 5 gallon bucket would not work all that well.
As far as air pressure goes, I used around 80-90 psi. More details on air pressure can be found on my original sprayer page.
It is important to clean the sprayer well after use - you don't want mortar to cure in the sprayer. About every 2 hours I would wash down my sprayer with water to remove the mortar.
I found the trigger needed some grease to make it move easily. I guess all the mortar and washing made it stiff to move. Once some grease was applied, I had no more problems.
Finally - think about safety! Be sure to:
- Protect your eyes.
- Wear rubber gloves (and vaseline on your hands to protect them).
- Use an air filter to avoid breathing the cement/lime mist.
- Use some hearing protection (the sprayer is a little noisy).
- And lastly ... always use a condom. :-)
Live near Ottawa (Canada)?
If you live near Ottawa and want to check these sprayers out, let me know and we can arrange a meeting. I live close to Wakefield, QC (about a 40 minute drive north of Ottawa).If you try building this sprayer, I'd love to hear about it. Or if you have any ideas or suggestions.