
[ John's Home > Our Strawbale Home > Stucco Sprayer - Version 1 ]
Stucco Sprayer
Of all the jobs when building a straw house, I think applying the stucco is the hardest. By using a sprayer, it speeds up the job and makes it easier on your wrist. Also, it creates a wonderful bond between the stucco and the straw, eliminating the need for chicken wire (at least for me).
The problem is that commercial stucco sprayers are expensive to buy. So I set out to build my own. I confess: this sprayer wasn't my idea, it is a modified version of the one presented by Paul Nabholz in issue 13 of The Last Straw (on page 14). I've tried to make the sprayer easier to build (Paul's requires the use of a lathe and brazing torch). Thanks to Paul for the original idea!
The sprayer took me about a day to build and about $20 in parts. I used a 5HP air compressor to run it, although Paul Nabholz mentions he runs his sprayer with a 2HP compressor. Note: the HP rating on air compressors is not the rating of the motor, but instead some other number. The motor on my compressor draws 15 amps @ 115V and is about 1.5 HP. Yet the compressor is rated 5 HP - go figure!
The Plans
Here are the plans:
- In DXF format: (I produced them using QCad - which is free)
sprayer1.dxf (23K)
sprayer2.dxf (19K)
- In GIF format: (you should be able to see these with your web browser)
sprayer1.gif (26K)
sprayer2.gif (14K)
I don't have any detailed instructions on how to build it - hopefully it will be fairly obvious if you are mechanically inclined. If someone wants to write some instructions to include here - please do!
Here is a picture of the sprayer before it has the handles on it. Notice I used an old tea pot as part of the hopper. In this picture you can see the tea spout. The spout didn't last too long - it got in the way and was sawed off real soon after I started using it. It sure added some character, though :-).
And here is another (not so great) picture of the sprayer with it's handles on. You'll see that the right handle is broken. This is because I used 1/4" plywood for it - which definitely wasn't strong enough for the job.
Operation
I ran my compressor at about 50-60 PSI. Paul says he ran his at about 25-30 PSI. Try it out and fiddle with the pressure until you find something that works well for you.
I made two mistakes with the air setup:
- I first moved my pressure regulator from the compress to the sprayer (thinking I would need to adjust the pressure frequently). However this basically made a mess of the regulator (mortar goes everywhere) and now it is pretty hard to read the pressure dial. In the end, there is no need to adjust the pressure as you are using it so keep the pressure regulator near the tank where it will stay clean.
- I didn't use a flow regulator. This was pointed out by my brother-in-law who works with compressors with his job. A flow regulator is needed because the running the sprayer is like fully opening the end of the compressor hose - this causes a big pressure drop at the sprayer's nozzle. Then what happens is that the pressure regulator sees this big drop and opens completely (trying to bring up the pressure). So the pressure regulator is pretty much always open which means it is doing no regulation and thus the pressure at the nozzle is the same as the tank (i.e. it varies up and down). What I should have done is placed a flow regulator after the pressure regulator so that the flow is decreased allowing the pressure to be properly regulated. Mind you, we got the job done. I am slowly starting to learn more about compressed air!
The sprayer shoots mud (mortar) at about 2 gallons per minute. This means that the little hopper empties in about 45 seconds! With my setup, I had one person mixing the mud, one person moving it from the mixer to a big pan close to where we were spraying and then another person as the 'filler' - their job was to keep the hopper on the sprayer full. Spraying is hard work because the mortar is dense - 5 qts of mortar weighs 25 lbs (more than twice the weight of water). We would spray one mixer load of mud (which covered about 8 ft x 4 ft of surface) and then would stop spraying. Someone would clean the sprayer and someone else would knock down the lumps with our trowels. This picture shows how lumpy the stucco is after it comes out of the sprayer compared to after troweling (the bottom is lumpy around the window and top is being troweled above the window). We would also apply more stucco by hand (using trowel and hawk) over the sprayed mud to fill in the holes we missed. You can see the finished scratch coat here - it turned out reasonably flat.
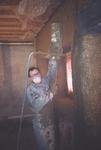
When using the sprayer, keep it about a foot away from the wall. It comes out in a fine mist - it's very hard to see. But you must keep the sprayer moving or else you will end up with big pimples all over your wall! Also, be sure to cover anything you don't want to be covered in mud. All windows must be covered in plastic, etc. Here is picture of the sprayer in action (you'll notice that I have the sprayer between my legs - there is no need to do this apart from acting goofy for the camera! ... boys must play). Before trying your sprayer with mud, be sure to practice by filling it with water (however it isn't quite the same since the water drains out the hopper even when no air is applied).
As you can see in the pictures, the work is very messy. Be sure to use rubber gloves (cover your hands with Vaseline in the morning - this will help protect them). You must also have eye protection and a mask to protect your nose and lungs.
The mix we used was 6 sand - 1 cement - 1 lime. Paul mentions in his article that the leanest he could run his sprayer was 12 - 1 - 1/2 before he got a sand pack (the sand settles and makes a very dense clot). Speaking of sand ... be sure your sand is stone-free! We had clean sand but it was moved by a backhoe from one spot to another and picked up some stone in the process. The stone gets clogged in the sprayer's 5/8" orifice and slows down work very quickly. We ended up screening all our sand by passing it through a sieve made from stucco lathe nailed over some 2x4's.
We used polypropylene fibers in our mud and it went through the sprayer with no problems. I'm not sure if chopped straw will work - someone should give it a try and let me know! (you might need a bigger orifice)
The mortar we used was more wet than what I'd mix for applying by hand. I made the mistake of initially try to use a stiff mix (to minimize cracking and maximize strength) but it was frustrating getting it to move through the sprayer. I had to often jiggle the hopper to get the mortar to flow. I quickly moved to a sloppier mix and that made it much easier to spray. We had a few cracks - mostly on the south wall. I think the problem was that I didn't keep that wall damp while it was curing (I did mist it with the water but it was too much work to keep it constantly damp in the blazing sun).
One problem I noticed was that after using the sprayer for about 10 days, it started to dribble. In fact it got so bad almost as much mud was ending up on the ground as on the wall! At first I thought the sprayer was getting old (hey - when I get old I will most likely dribble and drool a lot!). The problem turned out to be some mortar had hardened in the nozzle. Air was coming out of the nozzle but not obviously enough. I shoved a piece of wire into the nozzle to clean it out and that fixed the problem. It is important to keep the sprayer clean - especially after you are done with it at the end of the day.
I'd love to hear about your ideas, suggestions, enhancements, etc. If you have some pictures, send them along and I will put them on this page. I'm particularly interested in people who use the sprayer for other uses - for applying clay-based stucco, ferrocement, etc.
Future Plans
What I'd really like to do is get rid of that hopper! It is really tiring holding that thing up in the air all day long. Also, the hopper gets in the way when you are trying to spray in tight corners (like near the top of the wall). Finally by not having a hopper it saves having a person standing around doing the 'filler' job.
This requires some kind of pump or pressure container to move the mud along a hose to the nozzle.
The problem with pumping mortar is that it is a non-Newtonian fluid - this means when you push on it hard, it tends to get sand packs. Not good! The best kind of pump for moving mortar is a progressing cavity pump. The problem is that these are expensive (at least $2000). Another type that can be used is a peristaltic pump. Finding appropriate hose for this type of pump is tricky.
Another idea is to put the mud in a container and to pressurize the container to move the mud. The main disadvantage of this method is that container can not be operated in a continuous fashion. However the advantage is that it is simple to build. Currently I am leaning in this direction.
If you have any ideas - I'd love to hear them! My dream is to simplify the stucco work so that straw home builders can do the work themselves without having to spend huge dollars on equipment.